You can have your precious
family photos restored like these examples, with
contrast digitally
improved and unsightly marks and scratches removed.
Black & white photos can be made sepia, which
usually improves them
markedly.
|
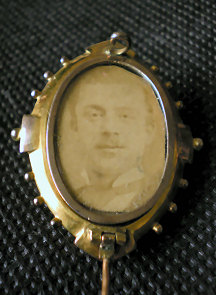
Even a tiny Victorian locket, as with
this one
here and no bigger than a finger nail, can have
something done with it.
See the larger examples of these and others below. |
Colour photos that have faded through exposure to light
can have much
of the lost colour brought back.
Wedding photos that were rather stark in black &
white now show up
more detail in sepia, such as detail of material and
designs on suits
and outfits previously not visible.
|
|
WATER AND FLOOD DAMAGED PHOTOS
If you have water-damaged photos, please don't
thow
them away until you've had an assessment to see what I
might be able to
do with them. Perfect restoration is not always
possible, but it can
often be enough to make them worth keeping for posterity
and family
history purposes. Some images are too precious to lose.
Even ripped and
competely torn photos can have something done with them,
just send me
both halves. The cleaner the tear, the better the
result. Don't try to
sellotape them yourself, and if they already have been
sellotaped, send
them to me as they are and I'll sort it out.
Most old photos can be restored to an amazing extent,
and most faults such as over or under exposure, fading
owing to age,
can be easily rectified. Where there are bad tears or
scratches, they
can be 'repaired' to a limited exent if they are over
the background of
the photo, but where faces have areas missing, then I'm
afraid it's
largely guesswork as to what was originally in there. So
in the case of
badly damaged faces, other than light scratches, not a
great deal can
be done.
I can also handle slides, card or plastic mounts,
even
glass slides. Also negatives, either singly or in
strips. If your
photos do happen to be damaged beyond repair, and you
still have the
negs, I can put them to CD or a camera card, memory
stick, etc, of your
choice. Just send the media of your choice along with
your material. In
fact, I can put whole slide collections to your media,
and tidy the
images up as I go, removing spots and hairline marks,
etc, as well as
bringing out the colours and contrast.
|
 |
Several more examples and comparisons of the type of
work
that can be undertaken are shown below. Each example is
shown at
roughly 100%, or the full size it would print.
Details of how you can order such improvements for your
photos are
below these samples, right at the bottom of this page
where we also
include a crib sheet to help you remember everything for
us to process
your order as well as advice on how to scan, or get
scans done for you. |
 |
|
|
This 1950s photo spent almost 40 years folded up in a
purse.
Quite badly damaged, but fortunately, no facial
details of this family
were missing. For those that don't intend to print the
photo for hard
copy, but require only digital copies for family
history files, this is
an ideal way to do it and include those images
previously thought too
poor to be worth saving. |
|
This was a very poor and under-exposed photograph,
from the
1930s. The results were pretty good, and in certain
circumstances if
the definition is high enough, they can be enlarged as
well. More on
that below ... |
|
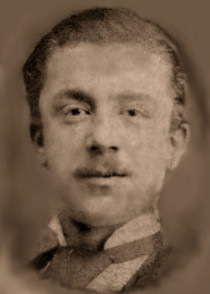
A lovely family heirloom was this Victorian locket,
containing a very dull and yellowed thumbnail-sized
image of a man
behind a very discoloured glass. Just how handsome he
was became clear
after scanning it many times the original size, and
then processing the
image as normal. The better than expected result is
only shown here at
50% size!. |
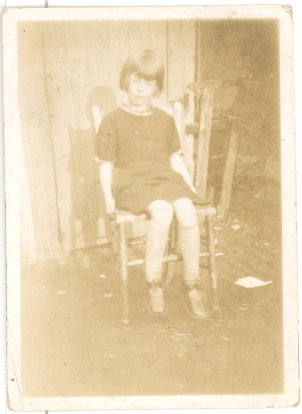
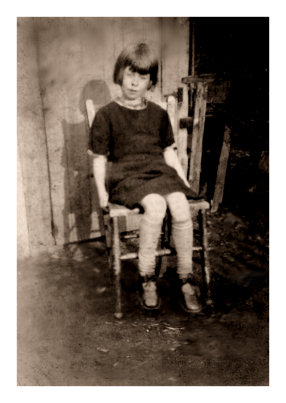
Another massively over-exposed, this photo must have
been a
big disappointment to this little girl's mum and dad
when it was taken
in 1939. I know this to be so .. for this is my own
mum.
|
An example of how a small print, seen here around
actual
size, from a Box Brownie type camera can be improved
and enlarged at
the same time. The little girl of 9 sitting on the
chair in the image
above is now around 20 when this was taken some 11
years later around
1950.
|
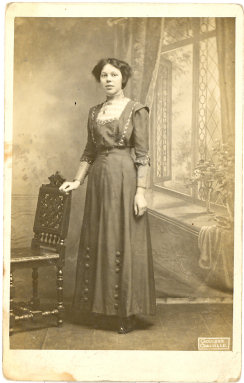
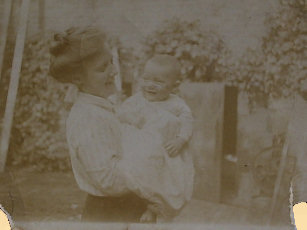
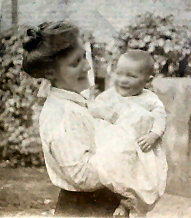
This charming photo dating from around the time just
after
the First World War is a typical studio photo of that
time, then
reproduced onto a postcard for family to send to
friends and relatives,
often at Christmas time to relatives abroad. It shows
very well how
processing the photo can reveal detail of costume and
even jewellry not
suspected before. In some cases, peices can be more
easily identified
for family history purposes.
|
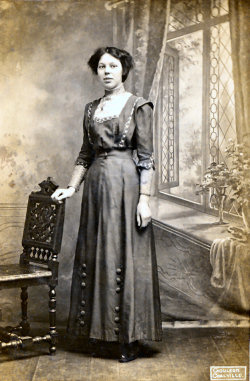
Another one in the same vein, from about 1911, but
this
young lady was much more badly marked as well as being
faded and
overexposed. The marks have been largely removed, and
the border
reformed and defined as well as adding a decorative
edging. The
improved contrast shows well in the girl's dress and
her facial
features.
|
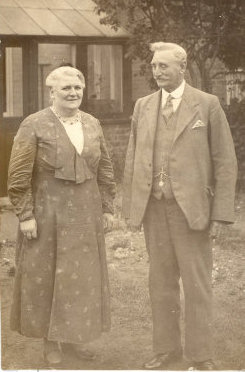
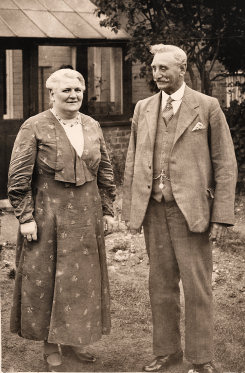
A good example of a photo that really only needed the
contrast improved, perhaps taken for this man's
retirement, where a
studio photographer would be invited to the home.
Taken around 1945,
just at the end of the Second War. Dress patterns,
watch chains, all
come up wonderfully well with some judicious
processing.
|
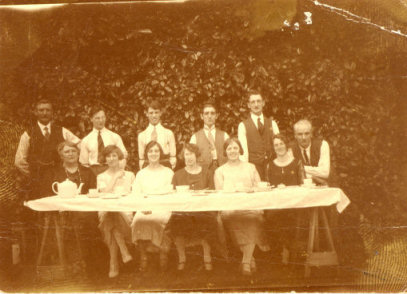
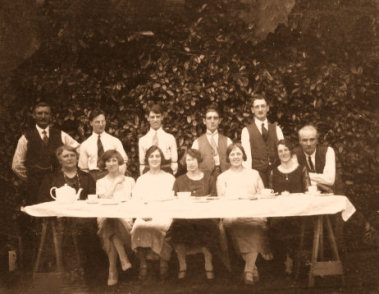
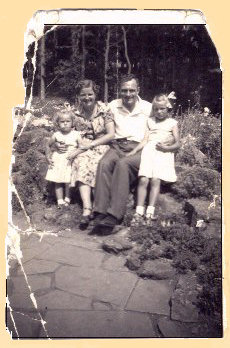
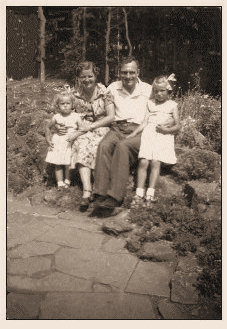
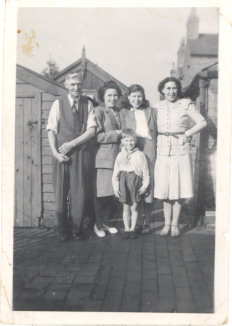
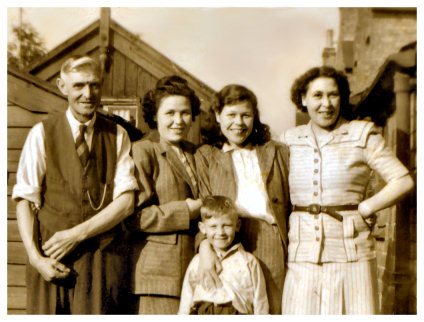
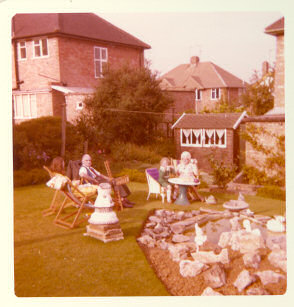
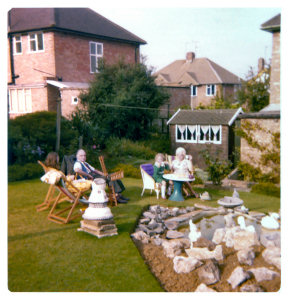
A classic family group photo, from the 1930s, damaged
at the
corners, showing quite a few scratches, and an
intrusive deep orangy
colour.
|
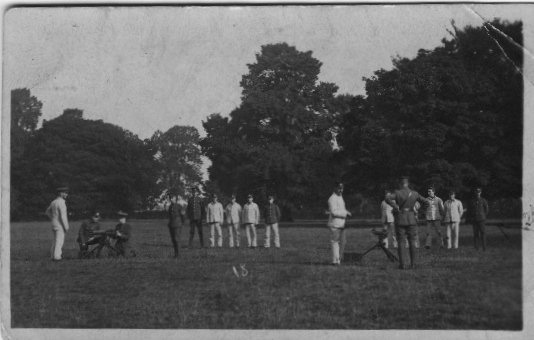
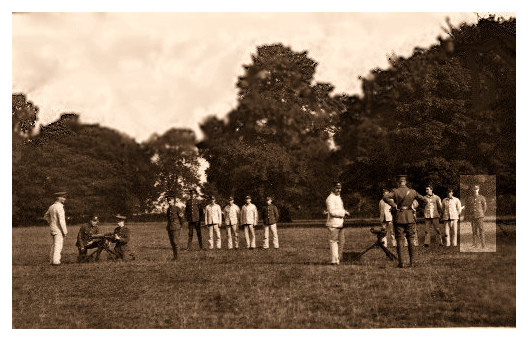
Military and uniform photos can be especially
satisfying to
improve, and often show up previously unrealised
badges of rank,
regimental insignia, decorations and other details.
Any extraneous
marks can be removed, such as numbers, or ink or pen
marks that may
have been someone's indication of where their
forefather stood, as was
the case here.
The man outlined on the far right had originally been
marked with a
large arrow in pen ink, all now removed.
In this photo of 1914, right at the start of the First
War, these men
are training to be machine gunners. Experts may even
be able to now
tell what make of machine gun is shown here.
|
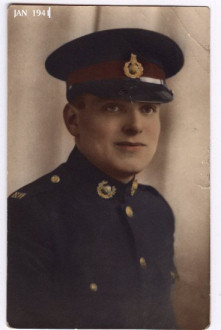
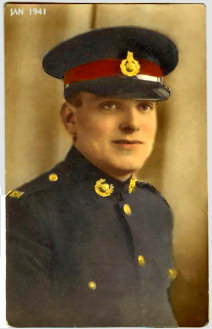
A particularly successful restoration of this photo of
a
Royal Marine
taken in a studio in 1941.
Being from an RAF service family, and having had links
with the Royal
Navy as well as the army, I especially like to do
military photos. I'm
familiar with and understand service protocols with
regard to uniforms,
badges of rank, decorations and awards. |
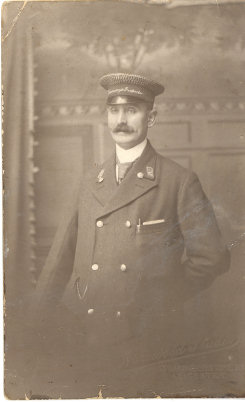
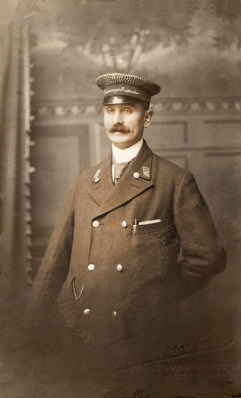
Here,
we have an over-exposed studio portrait of the 1930s
of
a tram inspector, that has been restored for contrast,
had the edges
and corners tidied up, and then very lightly colour
tinted. Photo
tinting was all the rage over 50 years ago, before
colour film became
more affordable, and many people bought the tints and
did the job
themselves.
Here, it can be done very carefully digitally, with
excellent results.
|
And
for our final examples, we show the restoration of
faded
colours. Do you have any of those classic Kodak
Instamatic photos of
the 1970s where colours have faded. In this case, the
blue and green
inks in the printing turned out to be fugitive, and
have almost
disappeared, leaving almost every photo of that era
with a
reddish-orange glow. I can restore them, as seen here,
to almost their
former glory. Again, it can be done digitally,
including removal of those
annoying thousands of tiny white spots on that era's
canvas-effect
prints that only show up with scanning.
|
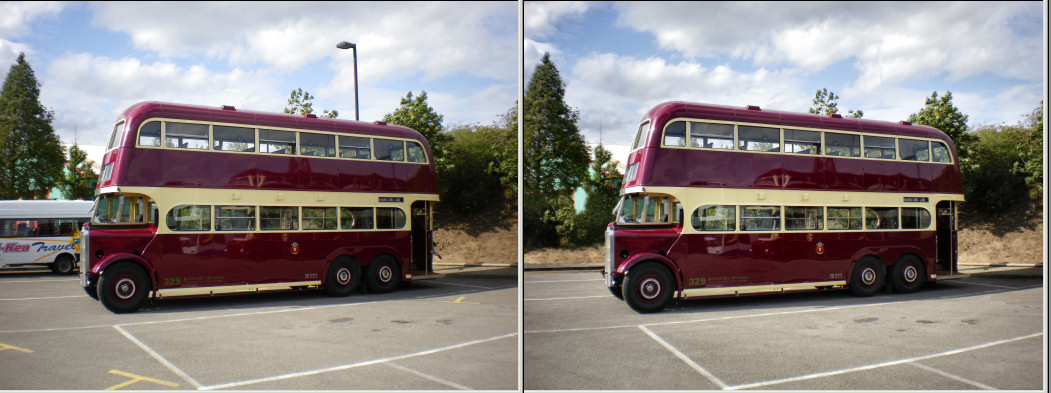
This
is an example of a fine modern specialist photo,
with unwanted items requested to be taken out.
Click the image to see what items were removed.
|
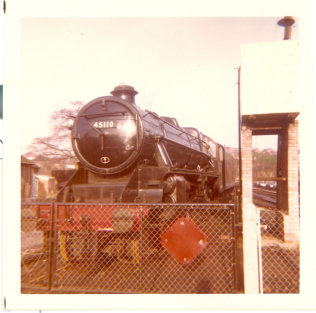
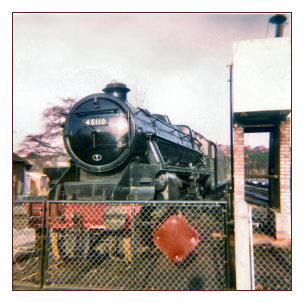
This was taken in the autumn of 1971, nearly 40 years
ago.
Over time, the colour has likewise gone more and more
.... pink! What a
fate for such an exalted loco! But ... hey presto, as
good as new. In
most cases, even background detail can be improved and
brought back to
life, and when scanned and shown full-screen on a
monitor or TV, say
via a CD, DVD or USB flash key, the results can be
positively stunning.
Photos that were previously thought to be irrevocably
spoiled,
including water damage, can at least be made to be
worth saving for
posterity and family history.
|

These two large sporting team photos from the world of
rugby league were recently restored to something more
like their former glory. The HKR photo dates from
1910, and is of the reserve team of that time. The
Hull FC photo dates from the late 1960s and was in
even worse condition, being in three pieces by the
time the 50 year old sellotape had been removed from
the front. Luckily, it was so old and dry it came off
easily without lifting any of the image. I retacked it
lightly on the back to hold it together in the
scanner.
The rest was just fine restoration, mainly done with a
pen-tablet. It can be done with a mouse, the earlier
ones above were mostly done that way, but a tablet
makes the job quicker, as well as for finer work. Both
images are shown much reduced , about 20% of real
size, so are not very clear here. The final results
were just larger than A4, and the result very fine
indeed, just as the originals would have been, but
minus the scratches, creases, spots and blots and
other extraneous marks old photos seem to pick up over
the passage of time.
|
HOW
TO ORDER AN ITEM FOR RE-PROCESSING FROM YOUR
COLLECTION
There are a
couple of points worth remembering if you decide to
scan your photo
yourself. Your scanner will scan at its default
settings unless you
alter them yourself. In most cases, default settings
will not give good
results for repairs. If you've not done so before, now
may be a good
time to experiment and have a go.
Firstly, make it at least full size, ie, choose at
least 100% in the
size requester for a 7x5 image. Scan it double size,
200%, if you can, to allow me to
give a much better result. In effect, scanning an
image double size is the modern digital way simply to
enlarge it.
Also, the scan resolution is very important too. Scan
at a minimum
resolution of 300dpi (dots per inch), for
basic results, and
for smaller photos, like little Box Brownie prints,
scanning at 300% and 600dpi is good. A
tiny print, scanned at double or treble size and at
600dpi gives me the
best chance for a surprising result.
Then send it to me by email, attaching it in just the
same way as you
would a family photo to a friend, etc. Don't worry
about it being a
very large file size, my email will handle it.
Anything up to 20Mb should
be fine for me to receive. Much depends on whether
your server allows files that big.
I will acknowledge by email that I have received it
okay, and give you
an immediate opinion as to whether I can do anything
with it,
to what extent it may be repaired or improved, and how
much it may cost.
If you decide to go ahead, I will attempt to restore
or revitalise your
photo, and then email it back to you so that you can
choose how and
where to print it. You may decide to print it
yourself, or take it on a
CD or flash key to a photo processors just like with a
digital camera
card.
Alternatively, you could have your photo/s transferred
onto a CD, DVD,
or send me your choice of flash key / memory stick,
along with the
photo/s, and I'll put it on there. I would email you
proof copies first
so that you can by satisfied by the results and see
what you're paying
for.
All proceeds from this service now go to benefit
the
Sutton
& Wawne Museum inside the Old School at
Sutton on Hull.
Prices start at just £5 for one photo up to
postcard size,
but proportionately less for more.
If you sent half a dozen for basic
repairing/restoring, a typical
charge would be £25
Typically, £5 would include improving contrast,
repairing
corners, removing bad scratches or tears, reforming
any border, a
certain amount of 'despeckling' and removing any
obtrusive spots or
stains.
Naturally, it is time-consuming, so larger photos or
more detailed fine
work would cost more.
I take payment by sterling cheque, postal
order, direct bank transfer, or cash by
arrangement.
or pay by a direct BACS donation to the Sutton
& Wawne Museum .. my preferred option.
Details supplied.
We're members of the Leicester
& Rutland Family
History Society, No HO789
|
HOW TO SEND ME YOUR
PHOTOGRAPHIC ITEMS
Ideally,
scan
them and attach in an email, sending one at a time if
you prefer.
Please be sure to include in your email your full
details, ie, name,
address, contact phone number, and any special remarks
or comments,
such as you would like them tinted, or b&w made
into sepia, etc. Naturally, if you
want me to scan them, that will be reflected in the
final cost. I've
placed a 'memory checker crib list' at the bottom of
this page for you
to copy and paste if it's of any help to you.
If you're not in a position to scan and would rather
send items by
post, it may be best to photograph them with a digital
camera for
yourself anyway, as a safeguard against the vagaries
of the Royal Mail.
Another ideal way is to take your image/s into your
local Print Shop,
and tell them what you want to do. Ask them to scan at
least 200%,
(300% is better for Box Brownie prints, and 600% for
lockets), at a
resolution of 300 or better. They'll put your photos
onto a CD for you
and then send me the CD. I'll put your restored photos
onto another CD
and send that back to you along with your original CD.
I can work with a digital photo of your image if
it's good and
sharp and clear enough. Stand the photo up
against a book on a
table, and keep the camera on something solid, like
another book. Use a
macro setting to get in close. Press the shutter very
gently. Take some
practice ones and delete the ones you're not happy
with. Remember to
use natural daylight, avoid flash and remember that
most photos are
reflective so position them where they won't be marred
by a reflection
of the camera itself or even something behind it.
Practice makes perfect ... and costs nothing with a
digital camera.
And, if all else fails, many folks have a grandaughter
or grandson that
is a wiz with a camera and emails. Seek their help ...
I can also take negatives that you may have in your
collection where
the print is missing, or re-process negs where the
print is lost or
damaged beyond repair. But a well-scanned image is
easier in the long
run, and you don't have to let the original out of
your sight. I've
recently scanned and improved the tiniest image found
in a family
Victorian locket. I scanned it at 600% ... six times
its real size, and
the improvement and detail that came out surprised
even myself.
If you send items by post, having then scanned them
myself, I will
return them fairly quickly by Recorded Delivery.
Again, please include
your full details, but additionally, each photo should
be numbered on
the back either in pen/pencil or with a sticky label,
and a description
attached of what the numbered items refer to : eg :
Photo 1 of 3 : Family group at table
Photo 2 of 3 : Portrait of lady sitting in chair
Photo 3 of 3 : Group of 3 soldiers
If you wish, place each item in a separate envelope or
paper within the
larger envelope and write your name and address on it.
If an image is
not already mounted on stiff card, a
piece of stiff card cut to size and inserted in the
envelope will help
enormously to keep the whole packet rigid. I know it's
not always
possible to write on the back of a photo, either
because there isn't
room or there are historic details that shouldn't be
defaced, ie with a
postcard or family portrait made as a postcard.
When I receive them, I will either email or telephone
you to confirm I
have them, and what was in the packet, and to further
discuss your
requirements. It may also help if you indicate in your
letter what may
be the best time for me to call, and of course, not
forgetting your
telephone number.
But in the first instance, please do just email me,
rather than sending your material blind. It's always
good to talk.
I look forward to hearing from you, and surprising
you by what can be
done with precious images thought lost or beyond
repair.
|
Email me for our postal address and other
details of how to pay.

Back to our
Home Page
A SUGGESTED CRIB LIST OF
REQUIRED
DETAILS
to copy and paste, and print or email
NAME :
ADDRESS:
phone number/s:
and best time to call
email address:
Photo 1 title :
description
Photo 2 title :
description
any special requirements or instructions
resizing or enlarging : sepia or b&w : removal
of
items : other alterations
|
|

